Apple Upside Down Cake Recipe
By Emma
Certified Culinary Professional
·
Recipe tested & approved
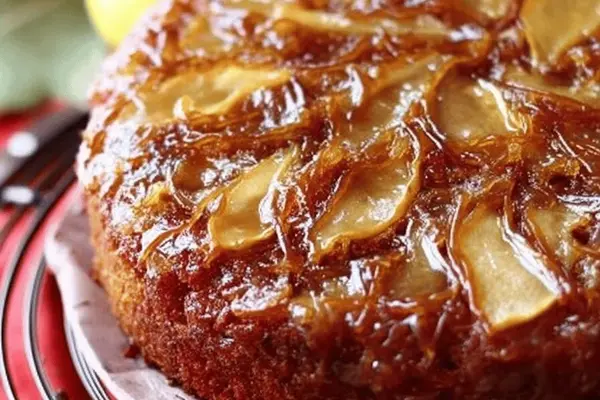
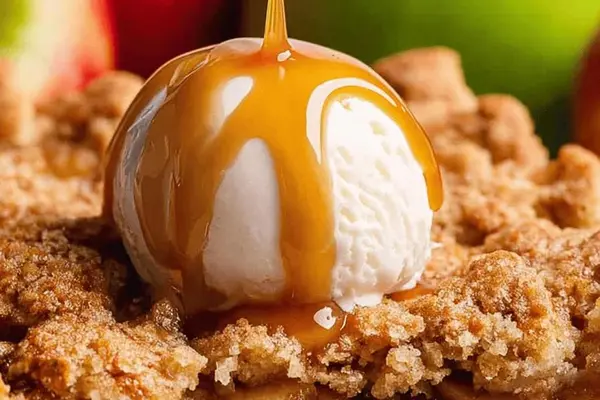
Apple upside down cake with buttery caramel, tender sliced apples, and moist yellow cake. Baked in a skillet and flipped for impressive dessert results.
Prep:
17 min
Cook:
48 min
Total:
1h 5min
Servings:
6 servings
Three pounds of apples. A cast-iron skillet. Caramel that smells like burnt sugar before it tastes like heaven. Forty-eight minutes later, you flip the whole thing over and it just works.
Why You’ll Love This Apple Upside Down Cake
Takes an hour total—most of it hands-off in the oven. The caramel gets dark and sticky without needing a candy thermometer or constant babying. Apples stay soft but don’t dissolve into mush because they poach gently in their own juice. Uses a box cake mix. Not complicated. Not apologizing for it either. The melted butter trick makes it taste richer than it has any right to. Comfort food that actually feels like you did something.
What You Need for Apple Upside Down Cake
Five and a third tablespoons of unsalted butter—the kind in a stick, not whipped. Brown sugar, packed. Doesn’t have to be light brown. Dark works too. Three large apples. Granny Smith if you want them to hold shape. Honeycrisp if you like a softer bite. Peel them, core them, slice thin—thinner than you think. A box of yellow cake mix. The standard size, about fifteen ounces. Two eggs. One half cup of melted butter, separate from the first amount. One and a quarter cups of water. Salt if your butter wasn’t salted. Cast-iron skillet, ten inches. Season it first if it’s new. The thing that matters most.
How to Make Apple Upside Down Cake
Heat the oven to 320. Not 350. The lower temp keeps the bottom from burning while the apples cook through. Melt the first amount of butter—five and a third tablespoons—in the skillet over medium heat. It takes about two minutes. Once it’s liquid, add the brown sugar. Stir constantly. Don’t walk away. The sugar dissolves into the butter first, then it darkens. Watch for the slight bubble around the edges. That means it’s almost caramel. Another thirty seconds and the whole thing goes from golden to burnt. Pull it off heat when it’s smooth and thick and smells like actual caramel, not scorched. This part takes maybe three minutes total.
Let it cool for like thirty seconds. Not long. Just enough so you don’t burn your hands. Lay the apple slices down in overlapping rows. They should cover the caramel completely but don’t fuss with them. Messy looks better here anyway.
Getting Apple Upside Down Cake Crispy and Golden on Top
The batter comes next. In a large bowl, whisk together the cake mix, eggs, melted butter, and water. Stir until smooth. Don’t overbeat it. The melted butter matters—it’s richer than oil, and it changes the texture. Don’t skip it or the cake stays kind of dense. Pour the batter over the apples. It looks thick. Doesn’t spread far at first. That’s fine. The heat spreads it. Don’t poke at it. Don’t try to smooth it with a spatula.
Into the oven it goes. Forty-eight minutes is the target but check at forty. The top should be golden—not dark, not pale. Edges pull slightly from the pan. A toothpick near the center comes out with a few moist crumbs but not wet batter. Some ovens run hot. Some don’t. You’re looking for set-ness, not dryness. Slightly underbaked is better than the other way.
Apple Upside Down Cake Tips and Common Mistakes
Pull it out and let it sit five minutes. The bottom firms up a little. The caramel sets just enough that it won’t pour everywhere when you flip. Get a plate ready. Something sturdy. Cast-iron is heavy and caramel is slick. Flip it swiftly—don’t hesitate. Expect some caramel to run. That’s normal. That’s the point. The best part ends up on the plate, not in the cake.
Let it cool for ten more minutes before slicing. The apples stay in place better when it’s warm, not hot. Cold apple cake is dry. Warm is perfect. The caramel’s still soft. The cake’s still tender.
If the caramel sticks during inversion, you either overcooked it the first time or didn’t melt the butter enough initially. Next time run a thin knife around the edges before flipping. Or brush the skillet edges lightly with neutral oil before you start the caramel step. Prevents sticking without changing the taste.
Apple Upside Down Cake Recipe
Prep:
17 min
Cook:
48 min
Total:
1h 5min
Servings:
6 servings
Ingredients
- 1/3 cup (5 1/3 tbsp) unsalted butter
- 3/4 cup packed light brown sugar
- 3 large apples, peeled, cored, sliced thin
- 1 box yellow cake mix, about 15.25 oz
- 2 large eggs
- 1/2 cup melted unsalted butter
- 1 1/4 cups water
Method
- 1 Heat oven to 320 F. Melt 1/3 cup butter in a well-seasoned 10-inch cast-iron skillet over medium. Add brown sugar; stir constantly until caramel smooth, bubbling thickly. Watch for slight bubbling around edges—not burning. Remove from heat promptly or caramel will darken too much.
- 2 Arrange apple slices over caramel in overlapping rows, layering as you see fit. No need for perfection, just complete coverage. Apples release juice in the oven, cooking gently in caramel bath without becoming mushy.
- 3 In a large mixing bowl whisk cake mix, eggs, melted butter, and water until smooth but don’t overbeat or you’ll toughen the crumb. The melted butter gives a richer texture than oil alone—don’t skip.
- 4 Pour batter evenly over the apples in skillet. Batter will look thick but spreads during baking—resist poking or spreading manually.
- 5 Bake 40 to 53 minutes or until edges pull slightly from skillet and toothpick inserted near center comes out with a few moist crumbs but no wet batter. Visual: top should gain golden hue, slightly puffed but not cracked.
- 6 Let sit 5 min after removing from oven to firm up base and avoid caramel spill. Keep a sturdy plate or cutting board ready for inversion.
- 7 Invert skillet onto plate swiftly—expect some caramel run-off; that’s normal, embrace the mess. Let cool a bit more before slicing to keep apples intact.
- 8 If caramel sticks during inversion, run a thin knife around edges before flipping next time or brush skillet edges with neutral oil before starting caramel step.
Nutritional information
Calories
430
Protein
4g
Carbs
65g
Fat
18g
Frequently Asked Questions About Apple Upside Down Cake
Can you make apple upside down cake with cinnamon apples or toffee flavors instead? You can add a quarter teaspoon of cinnamon to the brown sugar mixture before it caramelizes. Or caramelize the sugar longer for a toffee flavor. Both work. Changes the taste, same technique.
What if you don’t have a cast-iron skillet? You need cast iron for this. The sides have to be tall enough for batter, and it has to handle oven heat without warping. A regular cake pan won’t invert without breaking. Not worth it.
How long does apple caramel upside down cake keep? Three days in a container, uncovered so it doesn’t sweat. Tastes better the next day actually. Caramel softens more. Flavors settle.
Can you use a different type of apple? Yeah. Granny Smith holds firm. Honeycrisp gets softer. Pink Lady splits the difference. Avoid mealy ones. And slice them thin or they won’t cook through in forty-eight minutes.
What happens if the caramel burns? Start over. Can’t fix burnt caramel. Just tastes like burnt. The whole skillet needs washing. Not the end of the world. It happens.
Does the cake recipe recipe need adjustment for altitude? Probably a bit if you’re way up there. More water might help. I’m at sea level so can’t swear to it. Check your cake mix box—they usually have guidance.
You’ll Love These Too
Explore all →
Crispy Tofu Orzo Stack with Lemon Herb

Cajun Chicken Pasta with Creamy Sauce
BLT Salad with Pasta and Shrimp
Baked Ziti with Smoked Mozzarella
Maple Pork Belly Tart with Herb Crust
Lemon Granita Affogato with Coconut Milk
Citrus Syrup Recipe with Fresh Lemon Juice
Brioche Bread with Cranberry Cinnamon Filling
Caramelized Peppers with Smoked Bacon
Celery Pimento Cheese Bites: Easy No-Bake
Nashville Hot Chicken Sliders Recipe
Apple Slab Pie with Chai Spice Crumb

Easy Breakfast Tartines: 5 Sweet & Savory Ideas

Fattoush Salad with Green Lentils
Amaretto Peanut Butter Pie Recipe No Bake

Corned Beef Cabbage Soup with Barley
Gluten-Free Chocolate Soufflés with Lime Zest
Pork Chops With Pears: Honey Maple Glazed
Berry Buttermilk Bundt Cake Recipe