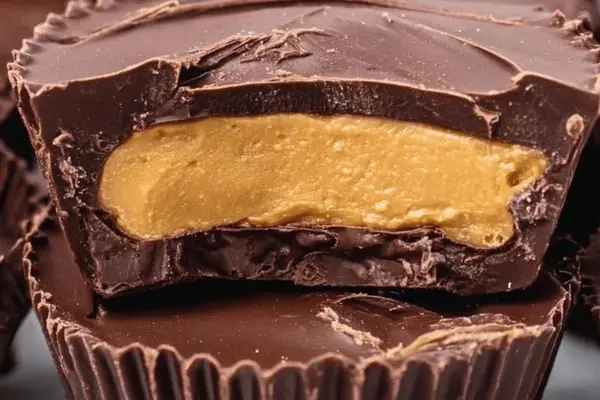
Chunky Peanut Butter Cups
E
By Emma
Certified Culinary Professional
•
Recipe tested & approved
A homemade twist on classic peanut butter cups using dark chocolate for richer flavor. Melt chocolate carefully in brief bursts, spreading by hand to avoid clumps. Peanut butter filling whipped with powdered sugar and a touch of cream cheese for tang and body. Uses cupcake liners but shake pan to get even chocolate bottom. Chill steps slightly shortened or lengthened depending on chocolate firmness. Substitutes: almond butter swaps smooth; coconut oil helps melt. Avoid greasy liners, or cups stick terribly. Sweet-salty, thick, crumbly filling contrasted with crisp chocolate shell. Watch for chocolate sheen to dull before layering. Freeze but don’t overdo or fillings get crumbly. Simple, flexible, some tweaks learned by trial and error.
Prep:
20 min
Cook:
0 min
Total:
50 min
Servings:
12 servings
#American dessert
#no-bake candy
#frozen treats
#peanut butter
#dark chocolate
Before You Start
Starting with that rich, bittersweet dark chocolate knocking around your cupboard. Melting it right never failed me—half of it at a time, slow and steady. I’d dump too-quick melted stuff and end up with grainy bits or burning. Using cupcake liners makes cleanup easier but watch how thin you spread chocolate, muscle through shudders and drips. Peanut butter filling? Creamy like silk but with a dusting of powdered sugar to keep that sandy bite I like. Tried cream cheese for a sharp twist—added interest but optional. Freeze times adjusted by poke and feel more than strict timing—cold chocolate cracks fast if left too long. It’s sticky, sweet, salty, chewy, vaguely crunchy—the kind of snack that makes hands dirty and smiles wide.
Ingredients
- 12 cupcake liners
- 8 ounces dark chocolate, divided
- 1 cup creamy peanut butter
- 3/4 cup powdered sugar
- 2 tablespoons unsalted butter, softened
- Optional: 2 tablespoons cream cheese for tang
In The Same Category · Desserts
Explore all →
Blood Orange Chiffon Cake
Corn Crumble Twist
Chunky Oatmeal Cake
Espresso Chip Brownies
Rustic Cookie Pie
Microwave Chocolate Mug Cake
Green Velvet Cupcakes
Chocolate Ginger Mousse with Kumquats
Caramelized Banana Foil
Twisted Marshmallow Cocoa Brownies
Apple Slab Pie Remix
Wild Blueberry Cheesecake Twist
Twist Pistachio Cake
Maple Pear Pudding Upside-down
Millionaire Bars Remix
Blueberry Angel Food Trifle
Apple Tart Reimagined
Caramel Apple Cheesecake
Classic Strawberry Shortcake
Clementine Cream Sandwiches
About the ingredients
Dark chocolate can be swapped for milk or semi-sweet depending on how sweet and rich you want the cups. If allergic or avoiding peanuts, almond or cashew butter works but textures differ. Cream cheese in filling is a secret weapon for slight tang and stabilizing texture—skip if craving classic smoothness or if cream cheese flavor is odd in your kitchen. Butter adds body but never use margarine; it won’t melt properly and affects mouthfeel. Powdered sugar binds and sweetens without gritty feel like granulated sugar. If you want a nutty flavor boost, lightly toast the peanut butter beforehand, but it transforms mouthfeel and requires chilling longer to firm. Cupcake liners prevent melting chocolate from sticking and make punching out servings easier. Paper liners with ridges are preferred for easier peeling; foil liners tricky—they stick worse.
Method
- Prepare cupcake liners in muffin tin. No shortcuts here. Liners stop melty chocolate mess.
- Melt half the chocolate in a microwave-safe bowl. Heat 20 seconds, stir to avoid burning. Chocolate grainy? Keep stirring, a little heat. You want glossy, thick but pourable.
- Drop about ½ tablespoon chocolate into each liner. Spoon with one, scrape with the other. Spread by shaking pan side to side until chocolate covers each bottom thinly, no holes. Careful not to break liners.
- Freeze 12–18 minutes; check surface. Chocolate should feel hard but not crack when nudged. Too soft? Add a minute or two.
- While chocolate chills, whip peanut butter, powdered sugar, and butter (and cream cheese if using). Beat until fluffy, not gluey. Watch sugar absorption; too dry ruins filling.
- Spoon 1 tablespoon filling on each cooled chocolate base. Pinch the sides clean—keep peanut butter off liners or chocolate won't seal well.
- Pop back in freezer 4–7 minutes. Filling needs firm enough for layer 2 but still creamy. If too hard, final chocolate bonds won’t be smooth.
- Melt remaining chocolate same way; no overheating. Stir till shiny and smooth.
- Cover peanut butter with chocolate completely, no filling peeking out. Tap muffin tin lightly against counter to level chocolate evenly.
- Chill 10–15 minutes till fully firm or refrigerate 15–20 minutes if in a hurry. Avoid freezer overexposure or chocolate dulls and cracks.
- Pop out liners carefully. If stuck, warm edges of liners slightly with hands or hot towel brief touch—tricky but keeps shape intact.
- Serve cool or at room temp. Crumbly filling texture versus brittle shell contrast is best appreciated if not too cold.
Cooking tips
Melting chocolate is an art—low incremental heat improves gloss and texture, avoiding graininess or scorch. Stir frequently to distribute warmth evenly; cold spots cause chunking. Spreading chocolate by shaking muffin tray—not spooning—gives smooth base over crumbs or bits, crucial for even bite. Freezing steps hinge on touch-test: chocolate sets firm but flexes a bit under nail; filling cool but not stone-hard or lips will resist bite. Hem in edges cleanly to prevent filling from mixing with final chocolate coat. Same bowl can be reheated but wipe edges to avoid dry chocolate chunks falling in. Tap pan gently to level chocolate top layer, creates neat finish and seals the edges. Avoid freezer scent or moisture—cover loosely or condensation ruins texture. If liners stick, partially warm with fingertips or a warm towel briefly to loosen. Work fast but steady; chocolate reforms quickly but patience at each stage yields defined layers without smudging.
Chef's notes
- 💡 Melt chocolate slow bursts. Stir often. Avoid microwave hot spots or grainy chunks. Use half at a time. Stir until glossy. Shaking liners spreads chocolate evenly. Don't use spoon here; gets thick, uneven. Thin coating crucial to prevent break and let filling stick.
- 💡 Freeze times vary. Watch surface. Chocolate feels firm, snaps but no cracks. Filling should be creamy but firm enough to hold. Too cold and final coat cracks or gaps show. Touch-test like old-school pro. Adjust by minutes not seconds. Visual clues better than clock.
- 💡 Filling texture is a balance. Too dry? Crumbles on biting. Too wet? Melts into chocolate causing pooling. Powdered sugar helps bind, butter adds body, cream cheese optional to cut sweetness and add tang. Whip till fluffy—no gluey mass. Taste-test before layering.
- 💡 Use cupcake liners with ridges for easier peeling. Foil liners stick and ruin edges. Greasy liners = no go. Peanut butter on liners = no seal, chocolate leaks. Pinch edges quickly after adding filling to keep them clean. Work fast but steady to maintain shapes.
- 💡 Final chocolate layer needs tap and level. Light tapping removes air bubbles, smooths ripples. Avoid freezer overexposure or chocolate dulls, cracks. Cover loosely to prevent condensation. When popping cups, if stuck, warm edges with fingertips briefly. Shape depends on patient handling.
Common questions
Can I swap almond butter?
Yes. Almond butter works for milder flavor, texture changes a bit. Filling fluffier, less salty. Adjust freeze time slightly; almond butter usually softer, may need longer chilling for firm layers.
What if chocolate gets grainy?
Heat too fast, hot spots in microwave. Stir frequently every 15-20 seconds. Use half-chocolate only. Graininess means broken cocoa butter; extra stirring helps but some batches refuse. Retry with new chocolate if needed.
How to fix sticky liners?
Warm fingertips or hot towel on edges breaks suction. Don't soak liners. Paper with ridges peels better. Grease equals stuck liners and ruined shapes. Try loosening gently, pop slowly to avoid mess.
How long can I store cups?
Refrigerate up to a week, keep airtight. Freeze longer term but beware crumbly filling if frozen too long. Bring to room temp before serving for better texture. Avoid freezer smell contamination; cover loosely but protect moisture.
You’ll Love These Too
Explore all →
Crispy Chicken Croquettes
Apple Pecan Dump Cake
Butternut Goat Cheese Tart
Spicy Tangy Antipasto
Sesame Salmon Wonton Soup
Green Velvet Cupcakes

Creamy Chicken Taco Soup Twist

Chicken Roulades Autumn Veg
Parmesan Cream Balls
Hot Butter Snow Crab
Zesty Lime Fudge
No-Bake Coconut Cream Pie
Chocolate Hazelnut Pancakes
Herbed Pork Filet Creamy Pasta Salad

Yogurt Flatbreads Twist
Savory Mushroom Rice
Crunchy Apple Fritters
Crab Cake Egg Rolls Remix
Lemon Pavlova with Twist
Savory Herb Fougasse