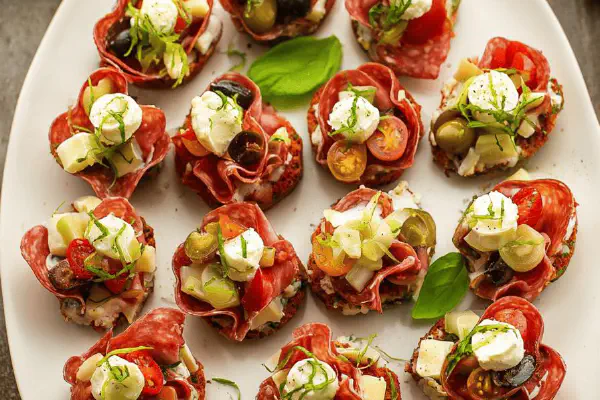
Crispy Salami Cups
By Emma
Certified Culinary Professional
Before You Start
Ingredients
- 12 slices superior quality salami, thin but sturdy
- 1 cup ricotta cheese
- 1/3 cup finely chopped sun-dried tomatoes packed in oil (or roasted red peppers for softer, sweeter twist)
- 1/2 cup shredded fresh mozzarella
- 2 tablespoons chopped fresh basil plus extra for garnish
- 1 clove garlic, minced
- 1 teaspoon freshly cracked black pepper
- 1 pinch crushed red pepper flakes (optional, for a subtle heat)
- Salt to taste
In The Same Category · Appetizers
Explore all →About the ingredients
Method
Preheat and Prep
- Heat oven to 380°F (somewhere between 375 and 380). Toss those salami slices into a muffin tin—push firmly into wells. Make sure salami starts hugging sides and base, forming a cup shape. Overlaps are fine, just cover well; holes mean leaks and greasy mess later.
Baking the Cups
- Into the oven; listen for gentle sizzling. Around 9-11 minutes until edges are darkening, crisp but not brittle. Crispy means ridged, browned, but don’t wait until blackened spots form. Smell will shift from raw meat to toasty, aromatic salami. Pull out; they’ll be floppy when hot but firming up while cooling.
- Rest 12-15 minutes, ideally on paper towels. Salami shrinks and toughens, excess grease bleeds out. Use tiny tongs or fork to pop cups loose. Be gentle — brittle edges can break. Set aside.
Prepare Filling
- Mix ricotta, chopped sun-dried tomatoes, mozzarella, minced garlic, basil, black pepper, red pepper flakes if using, and a tiny pinch salt. Taste. Adjust seasoning; filling should be creamy but punchy, balanced acidity from tomatoes or peppers. Freshness in basil lifts it all. If too dense, loosen with small splash olive oil or lemon juice.
Assembly
- Spoon filling carefully into cooled cups. Don’t overfill to avoid messy handling later. Top with an extra leaf or two of basil for color and freshness. Arrange neatly on platter.
Serving and Storage
- Serve immediately for best texture—crisp edges, creamy centers. If prepping ahead—cool cups thoroughly, store separately in airtight container. Filling also stored chilled separately to avoid sogginess. Combine just before serving. Avoid reheating salami cups; they get rubbery instead of crispy.
Troubleshooting
- Salami not crisping? Oven temp too low or crowded tin. Try thinner slices or bake a bit longer but watch closely. Oily mess on plate? Drain longer on paper towels, maybe blot with clean kitchen paper before filling. Filling too wet? Drain tomatoes well, use less if substituted with fresh peppers.
Tips
- Salami cups double as mini charcuterie vessels—try different cheeses or add chopped olives in filling. Efficient to line muffin tin with foil for easier cleanup. Experiment with spices—thyme or oregano can surprise in small doses. Learning when salami is done is key; trust sight and smell more than minutes.
Cooking tips
Chef's notes
- 💡 Salami slice thickness matters big. Too thick and cups don't crisp well, edges stay chewy or grease pool inside. Thin but sturdy slices work best. If slices too thin tear easy, fold carefully. Also, overlap slices slightly to seal base and sides well. Gaps leak fat, grease dump, soggy mess later. Muffin tins can be lined with foil for easier cleanup but watch heat conduction—sometimes foil dulls browning edges. Oven temp 375-380°F solid range; lower than 375 and salami won’t crisp, over 380 and risk burnt bitterness. Watch edges close and smell change—aroma is prime doneness cue.
- 💡 Cooling is underrated step, huge difference in texture. Hot salami cups floppy, soft. Let rest 12-15 mins on paper towels—excess grease bleeds out, cups firm up, stay crisp. Use tongs or fork to gently pry cups loose. Handle edges gently, brittle once cooled. If hot cups handled badly, break and collapse. Filling chilled and cups cooled separately prevent soggy bites. If planning ahead, store filling airtight and chilled, cups wrapped in paper towels or container lined with wax paper. Combine filling last minute—assembly part easy but critical.
- 💡 Mix filling with layered flavors and texture in mind. Ricotta is base, soft creamy, neutral canvas. Add finely chopped sun-dried tomatoes packed in oil—or swap roasted red peppers for milder, sweeter profiles. Basil chopped fresh adds bright herbal freshness, must not skip. Garlic minced fresh, not powder, packs punch. Black pepper cracked fresh, flakes optional for heat but add subtle warmth. Salt sparingly, filling already salty with cheeses and salami. If filling too thick, small splash olive oil or lemon juice loosens mix without watering down. Taste mid-mix, adjust acids or salt before spooning.
- 💡 Baking cues mostly sensory not strict timer. Listen for light sizzling sound once cups in oven—that’s fat rendering and crisping. Edges darken but don’t burn. Crispy means ridged, browned, not blackened spots. Smell change crucial—raw meat aroma shifts to toasty, porky, aromatic scent. Pull out around 9-11 minutes but watch close; zones may brown unevenly due to oven hot spots. Use visual + aroma clues over minutes. Overbaking ruins texture—edges brittle, burnt. Undercooked means limp cups leak grease.
- 💡 Assembly delicate balance between enough filling and not spilling. Overfill and cups messy, difficult to eat. Underfill and bite lacks flavor punch. Use small spoons or knife tips to portion accurately. Garnish with extra basil leaves for color and herb scent. Arrange cups neatly on serving platters for easy grabbing. Avoid reheating cups—they turn rubbery, lose crisp texture fast. Eat soon after assembly or chill separately. Cleanup tip: lining muffin pan with foil or parchment speeds cleaning, traps grease well. Salami cups double as fun charcuterie vessels—try variations with chopped olives, spices like thyme or oregano for flavor shift. Learning salami done cues by sight/smell trumps oven time every time.
Common questions
How to prevent soggy salami cups?
Cool cups fully before filling. Store cups and filling separately. Use paper towels to absorb grease. Don’t mix filling in too early. Chill filling to avoid moisture leaking in. Also check salami thickness. Too thick traps grease inside cup—they stay soft, not crisp.
Can I substitute sun-dried tomatoes?
Yes slices roasted red peppers work well, softer, sweeter less tangy. Fresh peppers too watery—drain well or roast first. Sun-dried tomatoes packed in oil give concentrated flavor and fat balance. Avoid fresh watery tomatoes or risk sog adjustments. Experiment small batches before swapping fully.
Trouble with salami not crisping?
Oven too low or slices crowded. Space slices well, don’t overlap too thick. Bake longer but watch. Use thinner slices or higher temp up to 380°F, not more. Listen for sizzling fat sound. Also check salami quality—some greasy or fatty types don’t crisp as well. Try dabbing excess oil with paper towels after shaping cups.
Best storage for leftovers?
Separate cups and filling always. Cups wrapped in paper towel inside airtight container stay crisp fridge up to 2 days. Filling in another airtight container chilled. Combine just before serving. Avoid reheating cups—results tough rubbery. If freezing, better to freeze filling separate; cups lose texture badly if frozen whole assembled. Real talk, crunchy cups don’t last well day two unless you keep them dry and separate.

