Home Made Condensed Milk

By Emma
Certified Culinary Professional
Ingredients
- 2 cups whole milk altered to 2 cups 2% milk
- 1 cup granulated sugar changed to 1 cup light brown sugar for twist
About the ingredients
Method
- Warm milk and sugar in a heavy saucepan low heat. Slow and steady. Sugar must dissolve or risk grainy texture.
- No stirring once large bubbles appear; tiny bubbles barely breaking the surface, teasing simmer stage.
- Raise heat slightly to maintain mild simmer; no full boil. That sound shifts from gentle hiss to steady bubbling. Resist stirring or mix breaks, curdling risk.
- Foam forms? Skim off gently, discard. Silent enemy for smooth texture. Avoid scraping sides—sugar crystals hide there, act like traps.
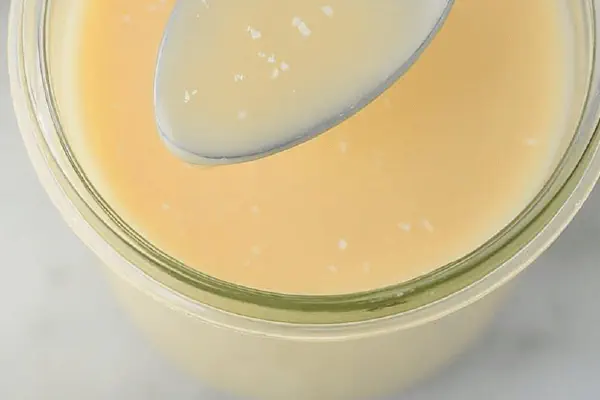
- Simmer 25 to 45 minutes, watching milk reduce. Colors shift creamy ivory to pale caramel. Texture thickens but don't expect canned thickness now; cooling finishes job.
- Remove from burner to cooler spot, transfer to heatproof jar or bowl. Let cool fully room temp. Patience here matters for texture development.
- Cover, pop in fridge several hours or overnight. Thicken more, flavors mature. If sealed, lasts up to a month, no funky smells or mold.
- Note: substituting evaporated milk cuts simmer time half but flavor less rich. Honey swap adds depth but watch burn risk at simmer start.
- Pro tip: heavy-bottom pans spread heat evenly—cuts scorching chances. Avoid sharp quick stirs; risk curdle. Use wide pan to shorten simmer time via surface evaporation.
- Troubleshoot if grainy: Likely sugar not fully dissolved or stirred during bubbles. Fix by gently reheating and skimming foam, no stirring.
Cooking tips
Chef's notes
- 💡 Start low heat always. Warm milk plus sugar till mostly dissolved before simmer. Any grainy bits come from sugar crystals not melted. No rush here. Watch for tiny bubbles—those are your cue to stop stirring. Stirring later breaks dairy proteins. Results? Clumpy, curdled mess almost instant. Skim foam right away. Foam roughens texture. Use ladle edge or fine spoon. Don’t scrape pan sides. Sugar hides there — scraping traps crystals back in mix causing grittiness.
- 💡 If swapping evaporated milk, cut simmer time by half roughly. Flavor less rich though. Honey adds depth but scorch risk jumps high early simmer. Reduce heat slower. Honey burns faster than sugar, darkens quick. Brown sugar swap? Adds molasses warmth, color shifts darker caramel faster. Adjust heat accordingly. Heavy-bottom pan mandatory. Thin pans scorch quickly unevenly. Thick metals distribute heat slow and steady. Avoid cheap nonstick or enamel with thin base. Your eyes, nose tell doneness better than timers.
- 💡 Foam forms? Skim constantly. Foam = denatured proteins, dry flaky if left in. Skim or texture shifts gritty. Timing matters. Simmer 25 to 45 minutes, depends on milk quality and stove. Watch color, creamy ivory shifts to pale caramel gently. Texture indicated by sheen, thickness, slow reduction. Hot mix looks runny but thickens as cools. Don’t panic. Pour into heatproof jar off burner. Cool away from draft. Room temp cool sets thickening pace. Refrigerate fully hours plus. Overnight best.
- 💡 Avoid stirring after bubbles form. Tiny bubbles are green light. Stir post bubbles? Mix breaks, proteins clump, curdle risk. Sounds shift from hiss to steady bubbling. That sound tells you simmer level. Mild simmer only. No full boil. Boil robs moisture too fast, scorches pan carbs. Wide pan speeds evaporation via surface area. Cuts simmer time some. But watch heat balance. Sound and appearance beat timers every time.
- 💡 Grainy texture? Sugar not dissolved or stirred after simmer began. Fix by gently reheating, skim foam again. No stirring! If foam returns, keep skimming. Side sugar crystals lurking, clean edges carefully but avoid scraping crystal buildup into pot. If stuck, wipe with damp cloth off heat. Cover jar airtight in fridge. Prevents drying out or fridge smells. Keeps up to month sealed, no mush or sour notes. Patience beats heat in condensed milk making.
Common questions
Why no stirring once bubbles appear?
Stirring breaks milk proteins. Texture breaks down, clumps form quick. Tiny bubbles signal simmer stage. Stir then means curdle risk jumps. Foam forms from denatured proteins, stirring disrupts delicate balance. Foam removal helps smoothness.
Can I use evaporated milk instead?
Sure but simmer time drops by half. Flavor depth lessened though. Evaporated pre-cooked concentrated milk - less cooking needed. Honey swaps work too but burns easier early on. Reduce heat, watch closely.
What causes grainy texture?
Sugar crystals undissolved or stirred too late. Foam left in makes gritty feel too. Fix by reheating gently, skimming foam carefully. Avoid scraping pan edges - sugar crystals hide, ruin smoothness.
How to store condensed milk?
Airtight jar in fridge up to month. Cover to stop drying out, fridge smells. Can freeze but affects texture. Room temp no good after cooking stops. Cool fully before fridge. Use within time frame for best texture and flavor.


