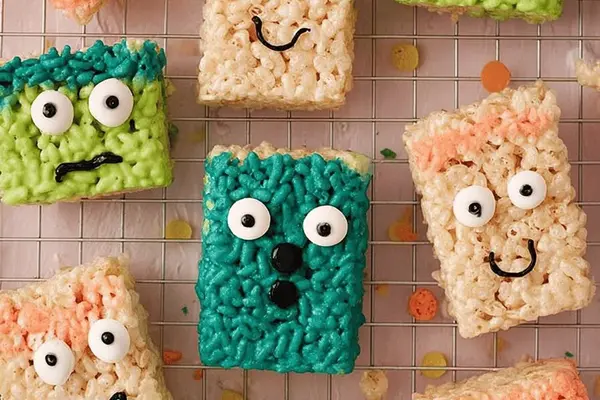
Monster Rice Treats with Candy Eyes
By Emma
Certified Culinary Professional
·
Recipe tested & approved
Cut the pan with nonstick spray first—doesn’t matter if it looks overdone. Grab 7 tablespoons of butter. Over really low heat. Not medium. Low. The butter should get shiny but if it starts to sizzle you’ve already messed up.
Why You’ll Love This Monster Rice Treats
No oven. No baking. Just a saucepan and 30 minutes from start to finish. Tastes exactly like the ones from the box, except you made them and kids actually care about that. The candy eyes make it automatic—doesn’t need frosting or decorating skills. Throw eyes on. Done. Works for any holiday or just a Tuesday afternoon when you need something that looks festive without actually trying. Stays chewy in the middle even after days if you don’t let them dry out completely.
What You Need for No Bake Marshmallow Rice Cereal Treats
Seven tablespoons of butter—unsalted matters because the marshmallows already have salt. A 12-ounce bag of marshmallows. That’s either 40 large ones or about 5 cups of minis. Six cups of crispy rice cereal. Not the store brand, not the off brand. The actual name brand works better for some reason. Colored candy melts. Buy several colors if you want variety. Candy eyeballs. The bigger ones stick easier than tiny ones. Frosting optional—white or colored, doesn’t matter. Some people skip it.
How to Make Monster Rice Treats
Get your 9x13 pan and coat it heavily with nonstick spray. The spray matters more than you think. Uneven coating means stuck corners.
Melt the butter over very low heat. Don’t rush this part. It should be shiny and glossy, not foaming or popping. Takes maybe 2 minutes. Could take 3. Depends on your stove.
Dump all the marshmallows in at once. Stir constantly. Scrape the sides and bottom because marshmallows stick to the pan and if you don’t get them all it ruins the texture. It’ll look lumpy and weird at first. Keep stirring. The lumps disappear. Stop the second it all looks smooth. If it starts to smell burnt or scorched you’ve gone too far. Happens fast at the end.
Take it off heat. This is when you add the cereal. Do it immediately because the marshmallow starts to set fast once it’s off the heat. Fold in the rice cereal with a big spoon or spatula. Use a folding motion—don’t beat it or the cereal breaks into dust. Every flake should be coated in that sticky marshmallow. It’s impossible not to crush some. That’s fine.
How to Get Monster Rice Treats Crispy and Chewy
Transfer everything into the pan right away. Use a buttered spatula or wax paper to press it flat. Don’t press hard. Press just enough to make it even. Pressed too hard and it becomes dense and heavy. You want it to stay crispy inside. Let it sit out and cool completely. This sets the structure. Don’t refrigerate. Don’t cover it yet. Just let it be.
Once it’s totally firm—takes maybe 20 minutes—cut it into shapes. Rectangles work. Squares work. If you want them to look like monsters cut them a little wonky. Uneven edges look more character-like.
Melt your colored candy melts in microwave-safe bowls. Follow the package instructions but basically it’s 30 seconds, stir, 30 seconds more, stir again. Overheating makes it grainy and separates. You want it smooth and pourable.
Dip the treats into the melted candy. You can do it halfway for two-tone effect or fully coat them. Let the excess drip off over the bowl. Hold them there for a second. Waste not.
Decorate immediately while the candy’s still tacky. Stick the candy eyeballs on—they stick way better to warm candy than to set candy. If you’re using frosting make sure it’s semi-soft so you can pipe details. Give them expressions. Make them weird looking. That’s the whole point.
Let them sit until the candy hardens completely. Don’t touch them. Don’t move them. Store them in an airtight container once they’re set. They’ll stay chewy for days if you keep them sealed.
Monster Rice Treats with Candy Eyes
Prep:
25 min
Cook:
6 min
Total:
55 min
Servings:
12 servings
Ingredients
- nonstick spray
- 7 tablespoons unsalted butter
- 1 12-ounce bag marshmallows (about 5 cups mini marshmallows or 40 large)
- 6 cups crispy rice cereal
- 8 ounces colored candy melts (several colors)
- candy eyeballs
- white or colored frosting (optional)
Method
- 1 Spray a 9x13 pan generously; important for no-stick. Set aside.
- 2 Melt butter in heavy saucepan over very low heat. Don’t rush; patience here is critical. Butter should be shiny but not browned or sizzling.
- 3 Add marshmallows at once. Stir continuously, scraping sides, until completely melted. Watch texture closely; lumps vanish but stop heating before scorching smell.
- 4 Off heat, fold in cereal quickly. Use big spoon or spatula. Coat every flake with sticky marshmallow. Don’t overmix or cereal crushes.
- 5 Transfer immediately into pan. With buttered spatula or wax paper, press evenly but not too hard. If pressed too firmly, treats become dense and lose crunch. Let cool completely—this sets structure. Rushing leads to misshapen bites.
- 6 Once firm, cut into desired shapes. Rectangles classic; squares bite-friendly; monsters need whimsical shapes.
- 7 Melt candy melts separately in microwave-safe bowls per package instructions. Usually short bursts with stirring. Overheating causes grainy texture or burning.
- 8 Dip treats partially or fully in melted candy. Let excess drip off. Hold over bowl to catch drips—waste not.
- 9 Decorate immediately with candy eyes and/or frosting details. Frosting works best if semi-soft, pipe gently for expression. Eyes stick better when candy coating is still tacky but not wet.
- 10 Let decorated treats sit undisturbed until candy hardens. Store airtight once set to maintain chewiness and prevent moisture loss.
Nutritional information
Calories
210
Protein
1g
Carbs
34g
Fat
7g
Frequently Asked Questions About Homemade Monster Treats with Colored Candy Melts
Can I make these with homemade marshmallows? Never tried it. Store-bought melts way easier and more reliable. Homemade ones might work. Probably need to melt longer.
How long do these last? Three to four days in an airtight container. After that they start to dry out but not in a bad way. Just a bit more firm. Still edible.
What if I don’t have candy melts? White chocolate works. Melts slower and tastes different. Chocolate coating works too. Completely different vibe but tastes good. Just use something that melts smooth.
Can I skip the candy eyes? Sure. Use frosting for the whole face. Piping takes longer though. Eyes are the shortcut.
Do I have to use 6 cups of cereal exactly? Not exactly. If your marshmallow mixture looks dry add more cereal a handful at a time. If it looks wet use less next time. Just eyeball it.
Why do mine stick to the pan even with spray? Didn’t spray enough. Or didn’t let them cool before cutting. Hot treats are sticky. Cold treats release easily.
Can I make these ahead and freeze them? Freezing changes the texture. They get harder and less chewy. Fine if you’re okay with that. Room temperature storage works better.
How do I cut them if they’re stuck together after cutting? They might fuse back together while sitting. Dust them lightly with powdered sugar or cornstarch so they don’t stick to each other in storage.
You’ll Love These Too
Explore all →
Pork Meatballs in Oven with Root Vegetables
Rustic Tomato Basil Sauce with Fresh Garlic

Italian Meatball Soup with Turkey & Pasta

Mango Sorbet with Lime Juice & Agave

Peanut Butter Crinkle Cookies with Cocoa

Homemade Self-Rising Flour Blend Recipe
Turkey Sandwich with Spicy Mayo and Avocado

Apple Cocktail with Campari and Sparkling Cider

Charred Broccolini with Garlic & Red Wine
Chocolate Crepes with Whole Wheat Flour

Green Fizz Twist Cocktail with Mezcal

Cherry Pie Dough Bombs: Fried Biscuit Bites
Grilled Beef Fillet with Garlic Butter Mushrooms
Bread Pudding Recipe with Cinnamon & Caramel

Red Potato Mash with Sweet Italian Sausages

Long Island Iced Tea Recipe with Mezcal
Chermoula Sauce with Parsley and Mint

Pumpkin Cookies with Cream Cheese Frosting
Crispy Oven Bacon Recipe with Maple Glaze