No-Knead Overnight Rye Bread Recipe
E
By Emma
Certified Culinary Professional
•
Recipe tested & approved
No-knead overnight rye bread with whole rye flour and butter, baked in a Dutch oven. Long fermentation creates a nutty, crusty loaf with minimal effort required.
Prep:
12 min
Cook:
42 min
Total:
18h 54min
Servings:
1 loaf
Sloppy dough at midnight, bubbling quietly on the counter while you sleep, then a Dutch oven transforms it into something golden and crackling by morning. No kneading. No babysitting. Just time doing the work.
Why You’ll Love This No-Knead Overnight Rye Bread
Takes 12 minutes to mix. Eighteen hours later, it’s done. Whole rye flour gives it something darker, nuttier—tastes like actual bread, not air. The butter melts into the crust while it’s still warm. Works on a weeknight because you make it the night before. Bake it tomorrow. Eat it warm or cold. Doesn’t matter. Homemade bread that doesn’t require a stand mixer or commitment to kneading. Just fold it once, trust the time. Comfort food that fills your kitchen with that smell. The one that makes people ask what you’re baking.
What You Need for No-Knead Overnight Rye Bread
Bread flour—300g. The white part. Gives structure so it actually rises instead of spreading flat. Whole rye flour. 100g. Not all of it, just a quarter of the blend. Brings this dark, grain-forward taste that white flour can’t touch. Fine salt. A teaspoon and a quarter. Smaller crystals mix faster. Salt kills yeast if clumped, so scatter it dry first. Active dry yeast. Half a teaspoon. Reduced because time does the rest. Low amount, long rise—that’s the whole trick. Lukewarm water. 345 milliliters, maybe a splash less if you like stiffer dough. Temperature matters—hot kills it, cold wakes it up slow. Melted unsalted butter. Two tablespoons instead of oil. Finishes richer. Olive oil works but tastes different.
How to Make No-Knead Overnight Rye Bread
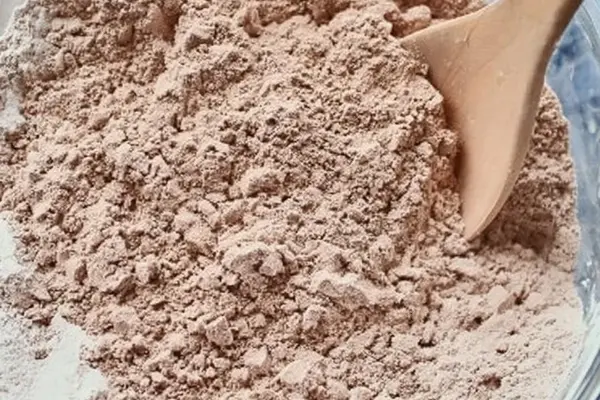
Large bowl first. Toss the flours, salt, and yeast together dry. Really toss. Salt spread out matters because clumped salt next to yeast is basically poison. Now pour the water in slowly while you stir with a wooden spoon—drizzle that butter at the same time. Stir until it’s shiny and rough and falling over itself. Shaggy. That’s the word. Looks like something you’d trash, but it’s exactly right.
Stop here. Don’t knead it. That’s the whole point. Resist that urge. It’s sticky and ugly and you’re going to feel like it’s wrong—it’s not. Cover the bowl tight with plastic wrap and leave it on the counter. Forget it’s there.
Fifteen to seventeen hours. Longer than a day but not by much. While it sits, time and yeast do everything. Bubbles rise to the surface. The whole thing gets soft and jiggly and smells like paste—not sour yet, just alive. Trust your eyes and nose more than whatever timer you’re thinking about.
When you’re ready, scatter parchment paper with flour. Now comes the delicate part. Scrape the dough onto it carefully—it’s wet and full of bubbles and doesn’t want to be manhandled. Sprinkle more flour on top. If it sticks to your hands, wet your fingers or dust more flour. Doesn’t matter.
How to Get the Crust Crispy and Deep
Fold the edges into the center gently. Don’t press. Just tuck and pinch like you’re wrapping something poorly. Creates surface tension. That matters for oven spring. The seams go on top—that’s where the bread splits and opens up. Let it rest covered loosely with a clean towel for 25 to 35 minutes. You’ll see it puff a little. Poke it and feel the wobble. That’s done.
While that happens, get your Dutch oven in the oven. Big, heavy pot with a lid. Crank the heat to 450 degrees. Let the pot get genuinely hot for 25 to 35 minutes—both the base and the lid. This is crucial. Hot pot plus water trapped inside equals steam, and steam is what makes the crust blister and brown instead of just pale.
Grab the pot with oven mitts. It’s dangerous. It’s exciting. Grab the parchment paper with dough, shake off loose flour gently, then slide it straight into the pot. The parchment goes in too—it’ll burn a bit but it burns slow. Lid goes on immediately. Steam jumps everywhere. If you want to score the top with a sharp blade, now’s the moment. I usually skip it—the bread finds its own cracks.
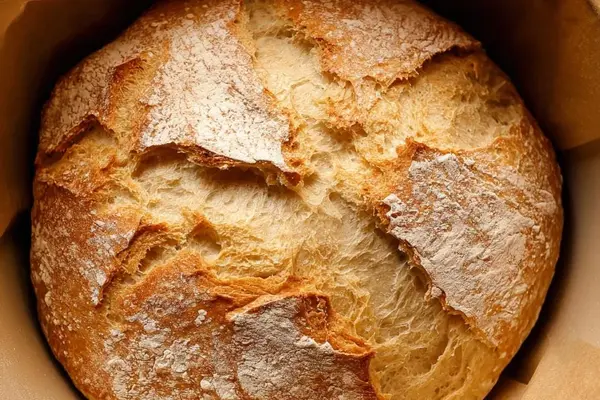
Bake 28 to 33 minutes with the lid on. Smell gets nutty and rich. You’ll hear the crust crackle a little. Remove the lid. Color shifts from pale gold to deep amber in the next 12 to 16 minutes. Watch it. Don’t rely on time here—ovens lie. When it smells like toast and warm grain and the edges are dark but not burned, it’s done.
No-Knead Overnight Rye Bread Tips and Common Mistakes
Dough too sticky? Flour your hands instead of fighting it. Use folding instead of anything forceful. It works. Spread flat with no rise? You overproofed. Shorten the first rise next time. Twelve to 14 hours instead of the full 17. Dough knows when it’s ready—trust the puff and bubble, not the clock. Dense crumb with no air holes? Underproofed. Let it sit longer. Maybe closer to 18 hours next time. Harder to mess up the second way than the first. Crust comes out pale? Your oven might run cold or the pot wasn’t hot enough. Check the pot temperature with an oven thermometer next time. Steam time matters too—don’t peek before 25 minutes. Bottom gets soggy? Cool it on a wire rack immediately. Don’t leave it in the hot pot or the residual heat steams the bottom until it’s gluey. Fifteen minutes minimum on the rack before you slice. No Dutch oven? Use any heavy pot with a lid. Or cover a baking tray with foil and put a pan of water on the rack below for steam. Not the same, but close enough. Can you use all rye flour? Technically. It won’t rise the same way—rye doesn’t have the gluten structure. One quarter rye is the balance. Stay there.
No-Knead Overnight Rye Bread Recipe
Prep:
12 min
Cook:
42 min
Total:
18h 54min
Servings:
1 loaf
Ingredients
- 300g bread flour, plus extra for dusting
- 100g whole rye flour instead of all white
- 1¼ tsp fine salt (about 7g)
- ½ tsp active dry yeast, reduced from ¾ tsp
- 345ml lukewarm water (maybe 2 tbsp less if you prefer stiffer)
- 2 tbsp melted unsalted butter substituting olive oil
Method
- Mix dough
- 1 In a large bowl, toss flours, salt, and yeast together dry, so salt is evenly spread (it’s yeast’s enemy if clumped). Add water gradually while stirring with a wooden spoon, drizzle melted butter at same time. Mix till rough, shiny lumps form. Looks sloppy, sticky, shaggy. Don't fuss. If too dry, splash tiny water; too wet, dust some flour on hands. Resist urge to knead. Important. Tell yourself patience is skill.
- First rise
- 2 Cover bowl tightly with plastic wrap or stretch film. Set on counter untouched for 15-17 hours, slightly less than a day. Bubbles on surface? Dough jiggly, full of life? Spotty cracks or a gentle dome? Good sign. Paste smell, not sour. Wet spots evened out. Trust your eyeballs and nose, not clock.
- Prep for shaping
- 3 Scatter a sheet of parchment paper generously with flour. Scrape sticky dough carefully onto parchment—bubbles dot the surface, dough looks soft and wet but holds shape slightly. Sprinkle handful of flour on top. No panic if dough sticks: wet hands or flour sprinkled often helps.
- Shaping
- 4 Fold edges gently into center, pinch seams like wrapping a crude package. No pressing or squeezing – just tuck dough inward to form rough ball. Gives dough surface tension, important for oven rise. Pinched seams high on dough top. Let rest covered loosely with a clean tea towel or linen for 25-35 minutes—listen for dough relaxation: it puffs a bit, little jiggly wobble when poked.
- Heat Dutch oven
- 5 While dough rises, place a large heavy Dutch oven with lid inside oven. Crank oven to 450°F (230°C). Give base and lid full 25-35 minutes to scream hot. This hot pot traps steam when dough drops in, key for blistered crust.
- Transfer to pot
- 6 Use oven mitts, grab flaming hot Dutch oven—dangerous but exciting. Grab parchment paper with dough; shake off excess flour on bottom gently. Slide dough and parchment into pot, no folding spatula fuss needed. Lid goes on straight away. Steam hisses. If you like scoring, now’s chance to slash top with sharp blade; I skip it mostly—bread noses out splits own way.
- Bake
- 7 Close lid, shove pot back in oven. Bake 28-33 minutes, smells nutty, rich, crust starts crackling audibly. Peek if needed; steam clouds. Remove lid. Crust changes from pale gold to deep amber in next 12-16 minutes, edges darken but not burn. Watch visually, tap bottom for hollow sound. Smell sharp toast, warm grainy punch. Keep checking.
- Cooling
- 8 Use tongs or stiff spatula to carefully lift bread from Dutch oven by parchment corners. Place on wire rack. Don’t skip this step or loaf will steam-gunk bottom, losing crispness. Cool at least 15 minutes—crumb needs to set; cut too soon and you’ll get gluey interior. Butter melts best at this stage.
- Troubleshooting
- 9 Dough too sticky to handle? Dust more flour on hands, use folding instead of kneading. Overproofed? Dough spreads flat with no rise in oven; shorten first rise next time. Underproofed? Dense crumb, no bubbles, tougher crust; wait longer next time. Oven temp varies; trust crust color and sound, not timer. No Dutch oven? Use heavy covered pot or a tray with water beneath oven rack for steam.
Nutritional information
Calories
320
Protein
9g
Carbs
58g
Fat
6g
Frequently Asked Questions About No-Knead Overnight Rye Bread
How long does this actually take from start to eating? Twelve minutes to mix. Eighteen hours on the counter. Forty-two minutes to bake. Then fifteen minutes cooling minimum before you cut it. So 18 hours and 69 minutes if you’re counting. But you’re sleeping through most of it.
Can I speed up the first rise? Not really. That’s the whole thing. Low yeast, long time. Faster temperature makes it sour. Warmer room helps slightly—72 degrees instead of 65 is fine. But you can’t cut it from 18 hours to six and expect the same bread.
What if my kitchen is too cold? Cold slows everything down. Might take 20 hours instead of 17. Look for the visual signs—bubbles, dome, jiggles—not the clock. If nothing’s happening after 20 hours, your yeast is probably dead or your kitchen is genuinely freezing. Try a warmer spot.
Can I shape it differently? The rough ball method works because surface tension. You could do an oval if you’re gentle. Long boule if you want. But don’t go overthinking it. The dough is forgiving as long as you’re not aggressive.
How do I know when the crust is actually done? Tap the bottom with your knuckle. Should sound hollow, like a drum. Color is deep amber, edges darker. Smells sharp and toasted. Internal temp hits 205 degrees if you’ve got a thermometer. One of those four things always works.
Does it need to cool before slicing? Yes. At least 15 minutes. The crumb needs to firm up or you’ll get a gluey, gummier texture. Butter melts into the warm bread and tastes better. But patience here matters—cut too soon and you’ll regret it.
Can I make this without the rye flour? Yeah. Use 400 grams bread flour instead. Lighter bread, less character. Tastes more like regular no-knead. Rye brings that darker, grainy something. Worth keeping it.
What’s the deal with the reduced yeast? Less yeast plus long time equals better flavor development. Yeast breaks down flour slowly and builds complexity. Fast rise with lots of yeast tastes like bread. Slow rise with little yeast tastes like actual food. It’s the difference that matters.
You’ll Love These Too
Explore all →
Grilled Chicken Tzatziki Pita with Cucumber

Oatmeal Peanut Butter Balls

Cucumber Appetizers with Cream Cheese

No-Bake Pumpkin Brownies with Chocolate

Zuppa Toscana Recipe with Chorizo & Kale
Thanksgiving Food: Port Wine Roasted Turkey

Saltine Crusted Chicken Tenders Recipe

Rainbow Layer Cake with Buttercream Frosting

Curried Chicken Toasts with Cucumber

Crispy Garlic Buffalo Wings Recipe

Peppermint Shortbread Cookies with Andes Candy
Easy Making Fudge with Chocolate Chips

Recipe For Chicken For Tacos

Chocolate Chip Cookie Recipe with Cinnamon
Peanut Butter Crinkle Cookies with Cocoa

Breakfast Burrito with Eggs, Mushrooms & Spinach

Double Chocolate Éclairs with White Chocolate Cream
Pork Parmigiana Patties with Eggplant

Chocolate Cake with Caramel and Heath Bars