Oreo Mug Cake Remix
E
By Emma
Certified Culinary Professional
•
Recipe tested & approved
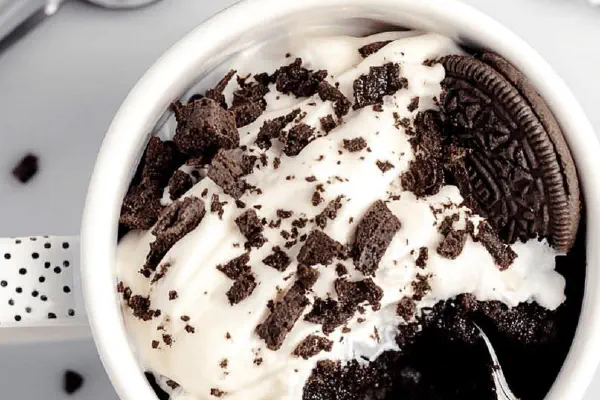
A single-serving quick mug cake using crushed Oreo crumbs, milk, mini chocolate chips, and baking powder. Modified ingredient to include a splash of espresso for depth. Microwaved till puffed and set. Finished with whipped cream and extra Oreo crumbs. High calorie, carb, and fat content. Ready in under 5 minutes. Tips on visual doneness and texture cues included. Ingredient substitutions and troubleshooting common microwave unevenness covered.
Prep:
4 min
Cook:
2 min
Total:
6 min
Servings:
1 serving
#mug cake
#quick dessert
#Oreos
#microwave recipe
#espresso twist
Before You Start
Mid-thought here—mug cakes, messy but fast. Oreos? Got to crush crumbs fine or disappointments come. I swapped some milk for espresso powder once, gave it edge. Chocolate chips flop in last step—without fuss. Microwave timing tricky; 2 minutes max for my unit, yours varies. Smell reaching out like chocolate fudge, edges firming but center still tender. Tried chilling once, ruined fluff—best hot. Rebel cooks will try other milks, whites, creams, predictors of fat, some fail miserably. Visual cues beat timer every time. Crafted this to dodge past failures. Burnt edges, soggy middle, overcooked dryness, learn from me.
Ingredients
- 8 crushed Oreo cookies (finely ground, about 1 cup crumbs)
- 3 tablespoons whole milk (or almond milk for lighter option)
- 1 tablespoon mini chocolate chips
- 1/8 teaspoon baking powder (fresh, not stale)
- 1/2 teaspoon instant espresso powder (optional twist)
- Whipped cream squirt for topping
- Extra crushed Oreo crumbs for sprinkle
In The Same Category · Desserts
Explore all →About the ingredients
Oreo crumbs, fresh grind crucial. Don’t resort to too-coarse bits—texture suffers. If no Oreo, crushed chocolate wafers stay close. Milk: whole preferred for richness, almond or oat milk cuts fat and calories but feel changes. Mini chocolate chips add melty moments—dark chips fine, white chips sweetness boost. Baking powder is the lifter; never use old stuff. Instant espresso powder optional, transforms simple sweet into nuanced dessert. Whipped cream optional but highly recommended; could use vanilla bean ice cream if available for more luxury. Extra crumbs sprinkle on finish adds crunch and visual punch. Substitutions demand attention to moisture balance and rising capacity. Got no microwave? Oven method less advised here, uneven heat wrecks mug cakes.
Method
- Start with a 10 to 12 oz microwave-safe mug. Drop in finely crushed Oreo crumbs first. Important: grind cookies very fine to avoid clumps.
- Add milk and espresso powder (if using). Stir thoroughly until crumbs soak and form wet mixture. Don’t rush here or pockets of dry crumbs remain.
- Stir in mini chocolate chips and baking powder last. Baking powder sets the rise; stale powder equals flat cake.
- Microwave on high power about 1:50 to 2 minutes. Listen for soft fizzing, rising batter expanding visibly. Stop if it looks wet on top after 2 minutes, add 10-second bursts instead.
- Once done, pull out mug and let cool 20-30 seconds—surface will steam, edges firm up, center soft but not wet. Too long resting dries it out.
- Spoon a dollop of whipped cream and sprinkle crushed Oreos on top right before serving. Adds crunch and cream contrast.
Cooking tips
Preparation is more about feel than timed steps. Grind Oreo crumbs down to almost flour texture. Stir milk in gradually—look for slurry that isn’t too thick or dry. Incorporate chocolate chips carefully to avoid sinkers. Baking powder last as contact with moisture immediately activates it; stir and cook ASAP. Microwave in bursts if unsure—listen for expanding batter, see bubbles form at edges and surface, slight steam escaping is good sign. Overcooked mug cakes turn rubbery; undercooked are gummy. Runtime varies by microwave wattage; 90-second mark, check center with toothpick or simply a touch test—springy but moist. Let rest no more than 30 seconds to retain softness. Whipped cream adds cool richness, contrast to warm cakey crumb. Sprinkle crumbs just before serving to keep crunch; do not mix in after chilling or topping wilts.
Chef's notes
- 💡 Grind Oreo crumbs down to near flour consistency. Coarse bits sink unevenly. Fine texture means less clumps, better rise. Use fresh baking powder always; stale powder equals flat mess. Add baking powder last after liquids to stop early activation. Espresso powder optional but changes flavor depth; measure carefully or bitterness spikes. Stir milk and espresso into crumbs fully; wet mixture signals no dry pockets. Check batter edge bubbles while microwaving; they hint at rise starting. Peak around 2 minutes max. Don’t trust timer alone, use look and feel.
- 💡 Microwave wattage varies a ton; I stop at 110 seconds then 10-second bursts if still wet. Overcooked edges turn rubbery fast. Rest only 20-30 seconds, surface steams then sets, center stays tender. Longer rest dries it. Whipped cream topping adds moisture contrast and crunch with extra crumbs sprinkle. Skip pre-mixing crumb topping; add just before eating or it sogs. Mini chips melt pockets creating texture change; add last so not too soft but avoid sinking. Small mugs are better; big mugs thin out batter, poor rising. Rotate or half-turn mug if no microwave turntable for even cooking.
- 💡 If no Oreo available, crushed chocolate wafers or cookie crumbs close substitute. Milk swap to almond or oat reduces fat but changes crumb feel. More liquid needed for certain milk substitutes; watch wetness level. Baking soda no good here; no acid to activate so no rise. Don’t replace with self-rising flour; extra flavors throw off balance. Chilling ruins fluffiness, tried once myself. Oven cooking less recommended — uneven heat hurts mug cake texture, microwave signals better via bubbles and steam. For crunch alternative topping, nuts or chopped peanut butter chips work; adds chew dimension without extra moisture.
- 💡 Watch batter surface carefully while microwaving; slight fizzing sound means rise starting, small bubbles around edges. Stop cooking if top looks shiny wet; poke gently—springy but moist center is key. If soggy, cook additional 10 seconds bursts and use toothpick check. Grind Oreos fresh right before use; stale crumbs clump more and dry unevenly. Baking powder expiry critical to rising success, stash fresh always. Use ceramic mugs only; plastic warps or overheats oddly. Mug size affects cook time and mug cake volume; 10-12 ounces range best. Stir gently to avoid sinking chips or activating baking powder early but thorough mixing vital to consistent texture.
- 💡 Wet batter consistency tricky; not too thick or powder won’t activate fully, not too runny or soggy result. Stir chips last, a few folds enough, prevents them sinking and melting into base uniformly. Microwaving buzz alive with smell around 1:30-2 minutes; edges firm, center soft press. Don’t wait for 2 full minutes if fizz cutting, bubbles forming then reduce intervals for nibble testing. Cool 20-30 seconds tops; too long leads to drying, crumb flakes. Spraying whipped cream topping right after resting locks moist contrast, extra Oreo crumbs add texture punch and visual interest. Experiment with alternate milks but track moisture balance closely to avoid flop.
Common questions
How fine should Oreo crumbs be?
Almost flour texture needed. Coarse bits cause dry spots or clumps. Fine grind promotes even rise and moist interior. Avoid lumps or bigger chunks.
Can I skip espresso powder?
Yes, espresso powder optional. It adds bitterness and complexity but omitting results in sweeter basic flavor. Alternatives like instant coffee exist but vary intensity.
Why won’t my mug cake rise enough?
Likely stale baking powder or too much liquid. Fresh powder critical; activates fast in moisture. Over-mixing or big mug size also affect rise. Try smaller mug and fresh powder.
How to store leftovers?
Best eaten immediately; leftover gets dense. Store covered in fridge max 1 day. Reheat short bursts in microwave, watch not to dry. Texture suffers but edible.
